

Vizrt Artist 3 User Interface
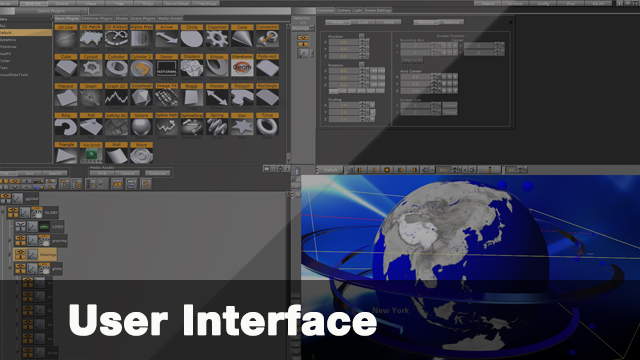
In the Vizrt Artist 3 User Interface you're presented with a 4 quadrant system. Along the top we have a main menu bar in which we can access different windows.
If we go into our native Built-in Objects within the Vizrt Artist 3 User Interface and drag Primitives into the scene, you can see a couple of things happened. One of which you can see a preview lower right window.
Along the top is our main tab bar and within this we can access different areas of the Vizrt Artist 3 User interface. For example, the server allows us to access our server window int the upper left.
In this server or database window we have different folders that we can organize our assets. So within here we can keep things such as images, fonts, textures, materials or we can import external 3D objects
We have all of our native built in Geometry plugins, so as we did earlier we drag these primitives into our scene tree window located in the lower left window. This is called the Scene Tree window and you can think of this, if you're familiar with Photoshop, kind of like the layers. Because as we dragged more objects or elements or primitives into our scene tree we can start stacking our containers. We have different options within our scene tree window if we need to sort or search different options and organize it in different ways, we can with the tools
Whenever you have an element within the scene tree and you click on a particular icon or property within a container it will take you to the upper right window which is the properties editor. So within here we can adjust certain properties of our containers that are in our Scene tree so we have options for position, rotation scale, axis center points. We can actually click on the properties of the individual primitive or plugins as well and adjust any of the settings within there. You can see when we do that in our lower right window our preview or render window it shows us the real-time results.
You can access different interfaces, so if we click on Views it will change the interface all together. This view gives us different views of our scene so here we have a front view setup, we have a top view and then we have a left view. We also have other windows here that we can access so if we click on the Tree tab it will now expand our lower left window into a full column on the left side. This may be necessary sometimes because believe it or not you’ll have so many containers within the scene tree that you may need the extra room.
We can also access our animation and keyframes within our user interface with the Stage button. If we click on the stage button it takes us into the stage where we can access our different keyframes and animation along with our timeline to control. We also have a server stage button which will now show the server plus our stage and it keeps the real-time render window available for us to preview the scene as well. Finally we have the tree + stage button, this shows us our tree and our stage on the right along the main topic.
We have the import button too so if we need to import an external 3D object or image or even a font we could use this import tab. If we need to export anything or archive anything we can use this archive button. Finally the Config button over here takes us into the configuration files so we can set different settings up for the software within this window here.
There's also a post button, which will allow us to post render any scene so we can make a tiff sequence an avi file, a QuickTime movie, whichever we need. There’s also an on-air button which turns it from a design device to a render output device.
With the user interface generally you're going to be working with 4 Windows here and as we mentioned the upper-left window is our server or database and which we can access anything that we need.
If we need to get rid of any container there's a trash can, so we can delete things just right in the center here as we drag.
Right underneath the trash can is the only thing you can do to change the user interface. Just drag this little window to resize the render window.